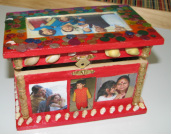
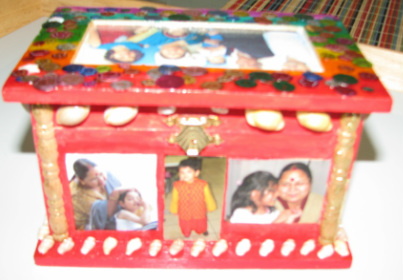
The kids' grandma was leaving after a long stay and my daughter and I wanted to give her something special that would make her smile and she could use everyday. I saw this wooden treasure box at Michael's and since it was blank (raw wood), we could let our imaginations run wild!
I wanted it to be a memory box so I browsed through my old photos.
Tip: do this part when you are relaxed and have completed your chores for the day - I got so engrossed that i did a night-out!
I wanted it to be a memory box so I browsed through my old photos.
Tip: do this part when you are relaxed and have completed your chores for the day - I got so engrossed that i did a night-out!
Materials:
- Wooden box
- Photos for decoupage printed per your size
- Scissors for cutting the photos and resizing if needed
- Mod podge
- Foam brush
- Acrylic paint
- Paint brush
- Sequins or beads for decoration
- Tacky glue
- Small sand paper with fine grains
Procedure:
Copy and paste the photos on a word document. You can select each photo in the word doc and reduce the size to about 1.5" x 1.5" or similar size depending the the sixe of your box.
I chose to print in color. Black and white photos would give a great classic feel. Print out the page of resized photos on a plain paper. Cut out the photos, plan how you want to arrange them on the box and keep aside.
Prepare the wooden box by lightly sanding it and wiping clean with a damp towel. Dry it. Cover the box with primer if you choose then paint using acrylic paint.
Decoupaging:
Spread an old bedsheet or newspaper on the table to protect your working surface. Start on the largest side of the box. Using a foam brush apply mod podge all over the side. Arrange your photos as planned in the earlier step. Then apply mod podge again to cover the the entire side including the photos. Let dry before turning the box to work on the other sides.
You can stick other items like beads or sequins to decorate as well. Just cover the whole side with modpodge after sticking with tacky glue.
Let dry completely. You can cover the inside of the box with a felt material cut to size.
Wrap it in tissue and place in a gift bag to present to Grandma :)
 RSS Feed
